First, we must laugh at me. Well, at least I made it through 9 weeks (more or less). Then the snowball started. It was custom orders, then pandemic, and gallery closings, and tutorials, etc. I am OFF the schedule, completely, of feeling the need to fill a quota. As I said on Facebook, I've gone feral (in more ways than one).
On Saturday, I will catch you up on jewelry I've made recently. On Friday, I'll catch you up on my latest tutorial. And tomorrow, I'll show you the results of my comparison of finishing techniques for cloisonne.
But today I show you my cloisonne enameling shelf. Not my enameling station... that's just my large work table with whatever set up I need for the day's project (kiln, torch, sifting, wet-packing, decals, graphite, liquid enamels, crackle, etc). And not my regular enameling shelf (I've got two other places for enamel, but this one I'm showing you today is specific to cloisonne).
Recently, it came to my attention that as I got more involved in cloisonne enameling (and thus accumulated more "things"), I needed a new space. If you are like me, finding space for a new space in your work studio is next to impossible. But, because I spent three days cleaning garage #2, I can move things from garage #1 into garage #2, then I can move things from the studio into garage #1 (things I don't use on a daily basis).
So here's my new space.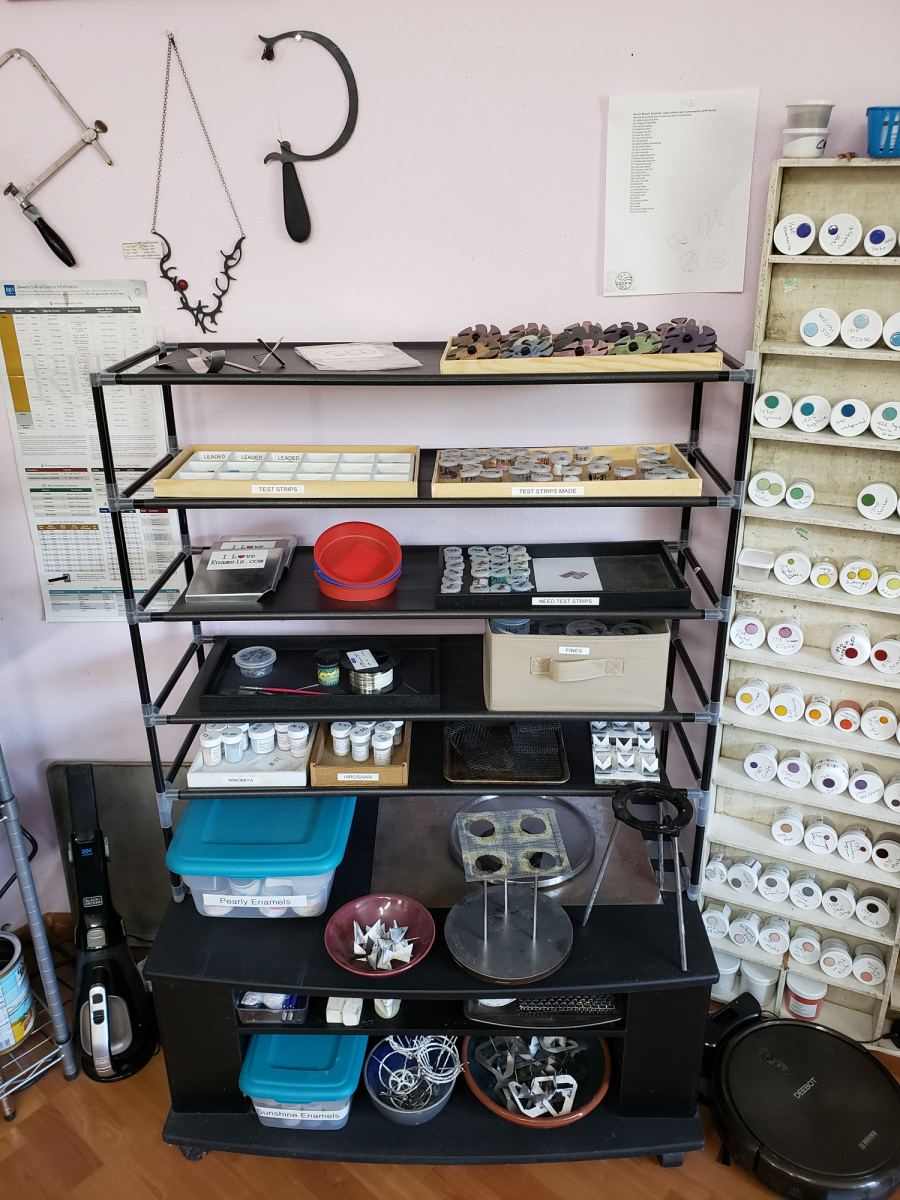
I'm showing you because I want you to see, it's nothing fancy. The "space" was put together using two piece of furniture I had in the house. The bottom is a tv stand. And on top of that, I have a cheap shoe rack. (Both items can easily be found at most thrift stores.)
And for those who want to explore my space, read on...
Shelf #1: Some enameling do-dads by "I Love Enamels" and Eugenia Chan. Some eutectic solder that I have not tried yet. And a small fortune in JoolTool wheels.
Shelf #2: On the left is a tray of my finished test pieces. I have each enamel color tested on fluxed silver, bare silver, and bare gold. This whole tray will be for my leaded colors and I'll have to start another tray when I start making test strips of the unleaded colors. The tray on the right has small containers of the already washed and sifted enamels that I have made color test strips for. So basically, these are the colors I want to use ASAP (because they were wet at one point and I hear the shelf life on washed enamels is... well, not as long as the ones that haven't been washed... which is another reason to only wash a small amount at a time).
Shelf #3: My "I Love Enamels" catch trays for sifting over. These are luxury items, but I like them and I figure I work with enamels enough that I can have some (okay a lot) of luxury items. Put it this way, though... I have about 50 luxury items and I don't have a hydraulic press... so I'm sure it all balances out. Next is my set up for sifting enamels for cloisonne. The rest of the set is in my regular enamel area. The tray on the right has enamels I've sifted and washed, but not yet made color test strips for (hey, these things take time!). By the way, if you want to know what little jars I use for my wet-packs, it's these. As I said, I only wash a little bit of enamel at a time... and every container I have has the enamel name on the lid as well as on the container itself. This is a no-brainer move.
Shelf #4: On the left is a tray of odds and ends that I use for cloisonne. Some nice tiny brushes from Pearly Karpel, some blue fuse (for champleve), cloisonne wire, (the foil and blue-stic were on my work table when I took this photo), needles, tissue blades, etc. The box on the right has my "fines" (fines are the very tiny particle residue from sifting). I usually use the fines as counter-enamel on test pieces, or pieces where the back won't show (see example in tomorrow's blog post). Here are the containers I use for those (again, label the lid as well as the container, trust me).
Shelf #5: Left to right... Ninomiya (Japanese leaded) enamels, Hirosawa (Japanese leaded) enamels, a cookie sheet full of firing racks (my new Merry-Lee Rae firing rack was in use when I took this photo... I'd gotten the 3x3 and next time I order from Enamel Art Supply, I'm getting the 4x4 one.), and finally a couple of the 6-trivet firing racks.
Shelf #6: Pearly Karpel enamels, a bowl of regular firing trivets, a Pearly Karpel enameling station, (and behind that) a heavy sheet of steel which is great to protect things when working with hot items, and finally a regular tripod for torching.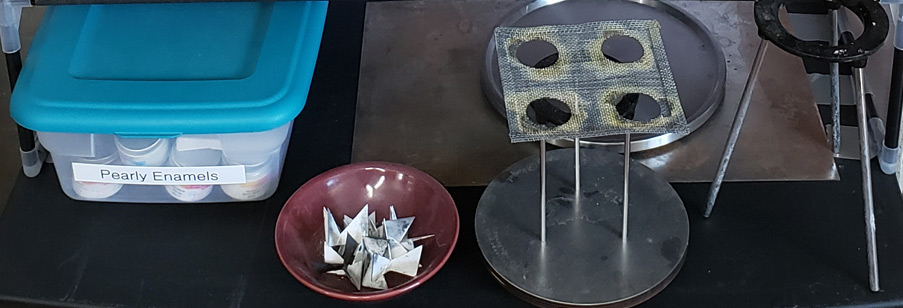
Shelf #7: (Which is actually two shelves)... Upper: box of extra do-dads for enameling, alundum stones, Squeegee oil (the other oils are behind that one), and a cookie sheet with heavy mesh squares and fiber disks. Lower: Sunshine enamels (for painting), a bowl of Eugenia Chan's awesome enameling baskets, a bowl of Pearly Karpel's awesome trivets.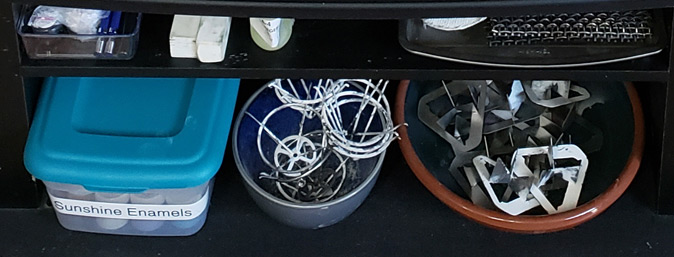
And while we're here, I may as well explain some of the things you can see around the cloisonne station...
Let's start at the bottom left. I have my dust buster because there are always little messes I want to clean up immediately (for example, I like to clean up the initial firescale that comes off the backs of my pieces right after I've applied the counter-enamel... I don't like things like that left to possibly contaminate anything for the rest of the work session). Above that is a chart from Rio that I refer to a lot because is has some handy info, like what size drill bit to use for which gauge wire, etc. The next three items (top left) are my two saws and a necklace I made. I like my Green Lion for most of my sawing, but I use the larger German saw if I'm cutting a piece of sheet that is more than 3" (German saw has a deeper throat). The shelving unit on the right holds my Thompson enamels. And the thing at the bottom right of the photo is my robot vacuum that I love. It cleans the floor after every work session, fits under almost all of my stations, and has a tray I can look through to see if it swept up anything I prefer to keep.
So there you have it. A peek into my studio to see that I may not have a beautiful storage set-up, but what I have is organized and functional. :-)
June 20, 2022